Securing your website with an SSL certificate is a smart idea and you now can do it yourself for FREE. Here’s how to create free SSL certificate using a real Certificate Authority.
I was working for a company that was paying out thousands of dollars annually to Symantec for security certificates. It cost them hundreds of dollars in consulting fees to even renew & apply them to their servers. They equated paying more for being more secure. Other than the warranty guarantee behind the certificate, it doesn’t work that way. I put a stop to them being gouged for hours of labor that really only took a couple minutes, then began to search for cheaper alternatives and found plenty of solutions with equal levels of security.
For people running their own servers who just want a secure connection they can either create a self-signed certificate, which comes with its own set of problems, pay for a cheap certificate, or create free, signed certificates using Let’s Encrypt.
Let’s Encrypt is a free, certificate authority providing SSL/TLS X.509 certificates. If you have root access to your server, you can use it to automate the certificate signing process. If you are on shared hosting, it’s a bit trickier. I’ve outlined the steps to creating free, signed certificates when using a CPanel environment, but the generated certificates can be used on whatever hosting environment you have, provided you have access to upload your own certificates.
Issue
You want an encrypted connection on your shared hosting, but you don’t have a dedicated IP address. Web browsers that don’t support SNI will give false warnings. Don’t worry, it can be done.
To summarize the process, you’ll run letsencrypt on your local computer, create the files & folders on your remote computer
Solution
Creating the Certificates
After downloading and installing letsencrypt from github on your local computer, you’ll want to open up a terminal and create certificates for domain and sub domain (www), manually. The command to create the certificate manually for both “www” and “without www” is as follows:
1
$> ./letsencrypt-auto certonly -a manual -d yourWebsite.com -d www.yourWebsite.com
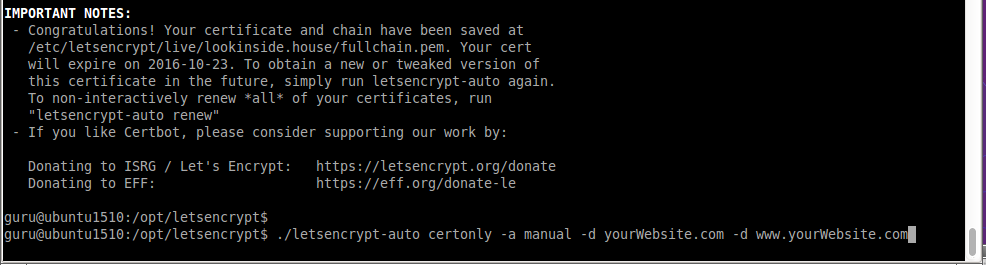
After following some simple prompts, letsencrypt will request that you create some folders and files on your remote web server. If you accidentally hit
ENTERthe process will fail and you may need to start over because the certificate authority won’t be able to find those files & folders.Next, create folders and secret file letsencryt requires on your remote server. You can use File Manager in CPanel, or just SSH to your server. After creating them hit
ENTER. If you’ve done it correctly, you’ll get a message congratulating you.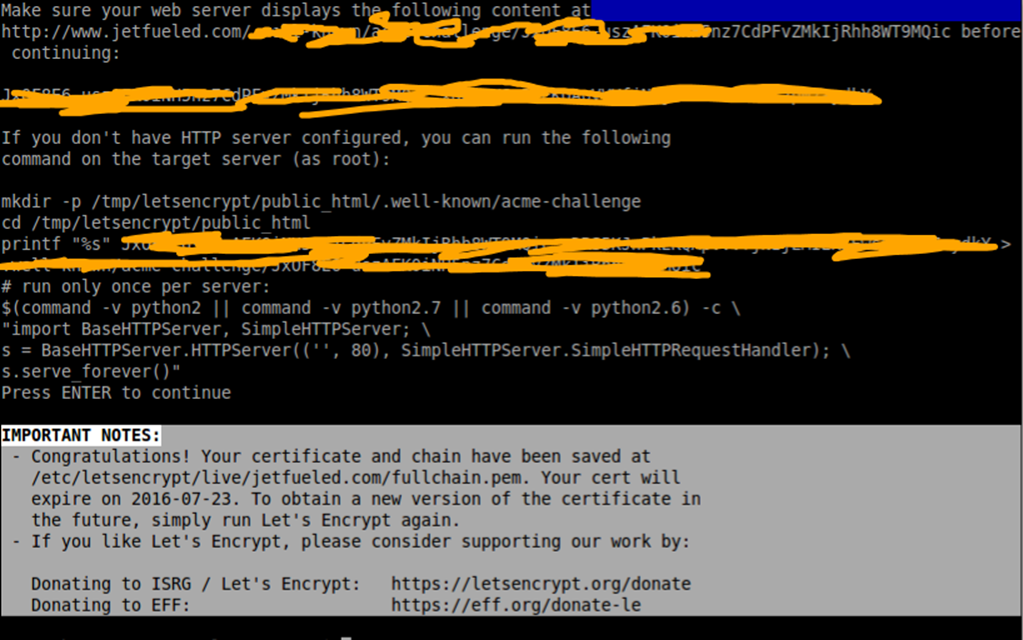
If you’re creating multiple certificates you may wish to copy the pem files to another location. I created folders for each of my domains and put the certificates in there.
Installing the Certificates on Cpanel
- Log into your CPanel
- Go to Certificates and Paste in the pem file (cert.pem)
- Install & Manage -> Update cpanel to use this certificate. “
- Choose domain -> autofill by domain, Paste in your private key, click “Install certificate”
Your connection is now secured!