Want to use virtual desktops on Windows 10? Here’s how to do it.
What used to be limited to the Linux & OSX crowd, is [finally] available on good ‘ole Windows. We only had to wait 20 years for it. Yes, I know there were alternative Explorer shells, but most were pretty buggy, and I prefer native features. After you get used to having virtual desktops, it becomes hard to work without them. Here’s are the steps to take to get started.
Issue
You have need several windows open when working on certain types of programs. Minimizing & maximizing them is a hassle. Enter the beauty of virtual desktops.
Instructions For How to Create a New Virtual Desktop
- Click the icon next to the Cortana icon
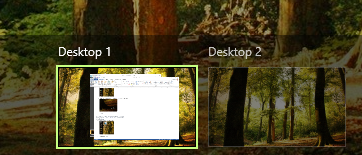
- Click the “New Desktop” icon at the bottom right side of your screen

That’s all there is to it! Now how do we actually use them? Read on.
Instructions on How to Switch Between Virtual Desktops in Windows 10
After creating a new desktop, how do you actually switch between them? See below for the solution.
Using the Mouse to Switch Between Virtual Desktops
- Click the icon next to the Cortana icon

- Choose your desktop
Using a Keyboard to Switch between Virtual Desktops
- Press
Ctrl+Win+Right/Leftarrow keys